

Learning how to build an octagon picnic table is one of the most satisfying projects you can do for your backyard. To build an octagon picnic table, you'll need to get good at cutting angles, put together a simple frame, and take your time with the assembly. The eight-sided table seats more people than a regular square one, and everyone can talk to each other easily since no one gets stuck at the "end" of the table.
This comprehensive guide shows you how to build octagon picnic table that's both beautiful and functional for your outdoor space. Flowyline free octagon picnic table plans include detailed measurements, cut lists, and step-by-step instructions that make this intermediate-level project achievable for most DIYers.
Read more!
Octagon Picnic Table DIY Overview: What You're Building
Here is an overview of how to build an octagon shaped picnic table that seats 8 people comfortably.
- Skill level: Intermediate (requires accurate angle cutting)
- Seating capacity: 8 adults comfortably
- Table diameter: 60 inches across
- Table height: 30 inches
- Seat height: 17 inches
- Seat width: 11 inches
- Seat overhang: 12 inches from the table edge
- Estimated cost: $200 — 300, depending on lumber prices
Understanding Octagon Picnic Table Dimensions
Before you start building DIY octagon picnic table, let's talk about the octagon shape in simple terms. An octagon has 8 sides that are all the same length.
When these sides come together, each corner has an angle of 135 degrees inside. For your woodworking project, this means you need to cut each board at 22.5 degrees on both ends.
Here's what you need to know:
- Corner angles inside the octagon: 135° each
- Your miter saw setting: 22.5° for every octagon piece
-
All inside angles added up: 1080°
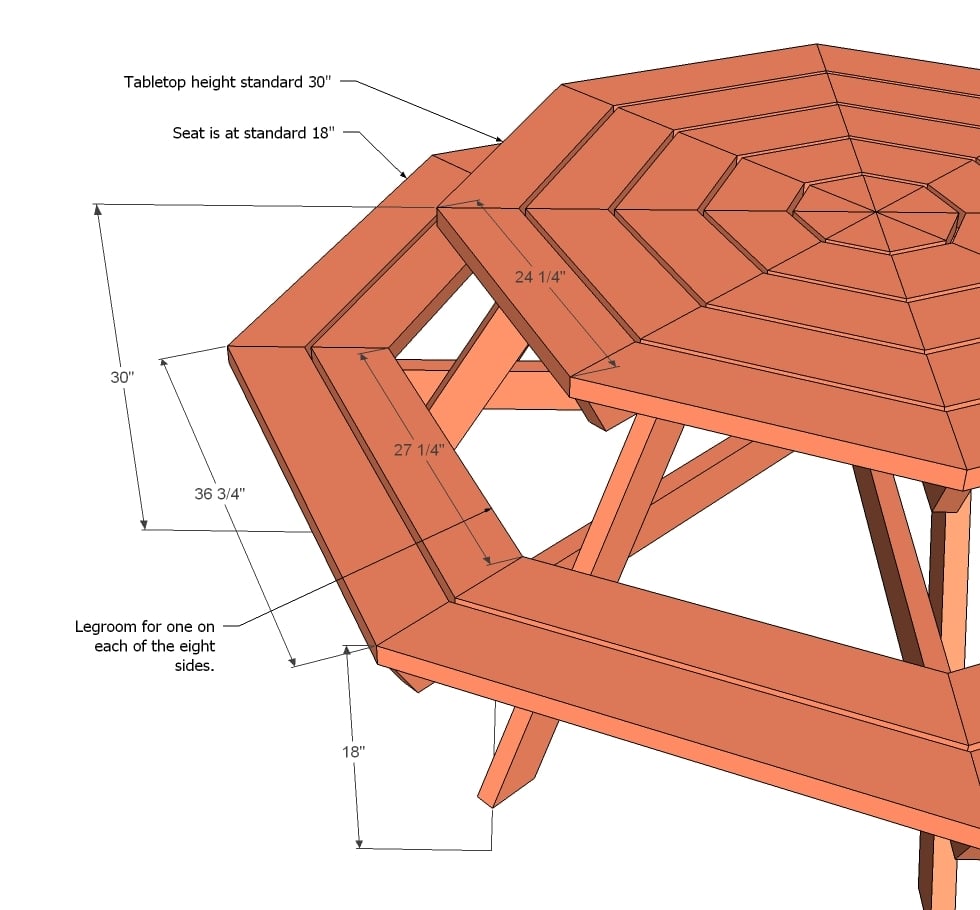
Octagon Picnic Table Dimensions — how to build an octagon picnic table free
Photo: Ana White
The math is pretty straightforward when you break it down:
|
A full circle is 360 degrees, and an octagon has 8 sides: 360 degrees ÷ 8 sides = 45 degrees between each side. Since you're cutting from the middle of that angle, you need 22.5-degree cuts. |
Why is getting the right octagon picnic table dimensions so important? If your angles are off by even one or two degrees, those small mistakes will add up as you go around the octagon. You'll end up with pieces that don't fit together properly, and then you'll leave gaps or overlaps that will frustrate you and weaken your octagon picnic table.
Why Should You Build an Octagon Picnic Table DIY?
Absolutely, for its one-of-a-kind shape. The octagon shape makes your picnic table smarter and different from others. It’s sturdy, weather-resistant, and cheap to build. It easily fits six to eight adults around it. It only takes a day to make a classic outdoor picnic table.
This picnic table is a quick, low-cost build. If you have a spare Friday afternoon, you'll have it done in time for the weekend. Because the wood is pressure-treated, you don't even need to paint or stain it — leave it as-is, and you're good to go.
Gather Materials List for Octagon Picnic Table DIY
Before starting your octagon picnic table project, having all materials on hand will ensure a smooth build process. The following lumber list is calculated for a standard 8-foot octagon table that seats 8 people comfortably.
1. Lumber Requirements
| Material | Quantity | Length | Purpose |
|---|---|---|---|
| 2x4 Pressure-Treated | 12 pieces | 8-foot | Framework supports |
| 2x6 Pressure-Treated | 20 pieces | 8-foot | Tabletop seat boards |
| 4x4 Pressure-Treated | 4 pieces | 8-foot | Table legs |
Pro tip: Buy 10-15% extra lumber to account for cutting mistakes and defects. It's better to have extra boards than to make a second trip to the lumber yard when you're in the middle of your project.
2. Hardware Checklist: Screws, Glue, and Finishing Supplies
Here's a list of hardware you need to build an octagon picnic table and why each item matters:
| Item | Quantity | Notes |
|---|---|---|
| 2½" Exterior Deck Screws | 5 lbs | Stainless steel preferred |
| 2½" Pocket Hole Screws | 1 lb | If using a pocket hole jig |
| Exterior Wood Glue | 1 bottle | Waterproof formula |
| Wood Filler | 1 container | Exterior grade |
| 120-Grit Sandpaper | 5 sheets | For orbital sander |
| Wood Conditioner | 1 quart | For even stain absorption |
| Exterior Stain/Paint | 1 gallon | Your choice of finish |
| Brushes Rollers | As needed | For finish application |
Essential Tools for Building an Octagon Picnic Table Out of Wood
While you can build this octagon picnic table with basic tools, certain equipment below can make the job significantly easier and more accurate.
1. Power Tools
| Tool | Required/Optional | Purpose |
|---|---|---|
| Miter Saw | Required | Accurate angle cuts |
| Drill/Driver | Required | Drilling driving screws |
| Random Orbital Sander | Required | Surface preparation |
| Pocket Hole Jig | Optional | Stronger joints |
- About the miter saw: If you only invest in one tool for this project, make it a quality miter saw. The ability to set exact angles and make repeatable cuts is crucial for octagon construction. A circular saw with guides can work, but it's significantly more difficult to achieve the precision needed.
- About pocket hole jigs: Although our guide on how to build an octagon shaped picnic table, pocket hole jigs are optional, it transforms your joinery from visible screws to hidden, professional-looking connections. The investment ($30 — 50) pays off in both strength and appearance.
2. Hand Tools
| Tool | Purpose |
|---|---|
| 25-Foot Measuring Tape | Measuring and layout |
| Speed Square | Marking angles |
| Pencil | Marking cut lines |
| 4-Foot level | Ensuring level assembly |
| Clamps (minimum 4) | Holding pieces during assembly |
| Digital Angle Finder | Verifying angles |
3. Safety Equipment
| Item | Why Essential |
|---|---|
| Safety Glasses | Protect your eyes from debris |
| Hearing Protection | Guard against power tool noise |
| Work Gloves | Protect hands from splinters |
| Dust Mask | Prevent inhalation of sawdust |
How to Build an Octagon Picnic Table in 4 Phases
The octagon picnic table project is broken down into four manageable phases that take you from initial cuts through final assembly. Follow us, and you can avoid common mistakes and ensure all the angled pieces fit together perfectly.
Phase 1: Planning and Precision Cutting for Octagon Picnic Table
Step 1: Create Cutting Templates
First, we need to set up a good workspace so you can work safely and accurately. Here is the process:
- Put your miter saw on a solid, steady surface, and make sure you have enough room on both sides to support your wood.
- Next, you set up a spot where you can spread out all your lumber and mark each piece before you cut it.
- After that, you use a thick marker to label each piece based on your cutting plan. It's really easy to lose track of which piece is which when you're working with different angled cuts.
Pro tip: Use stop blocks when you need to make the same cut over and over. If you need eight pieces that are all the same length, a stop block will make sure every single one comes out exactly right.
Step 2: Get the 22.5-degree Cut Right
Your whole project on how to build an octagon picnic table depends on getting this one angle right. Before you cut your real wood, practice on some scraps first to make sure your saw is set up correctly.
- Cut two test pieces at 22.5 degrees and put them together to see if they make a perfect 45-degree angle.
- Check your test cuts: Hold your two test pieces together. They should fit perfectly with no gaps between them. If you see a gap, your saw isn't adjusted right, and you need to fix it.
- Set your miter saw to 22.5 degrees and leave it there for all your octagon cuts. Don't change the angle between cuts, or you'll mess things up.
- You need to use a pencil to mark which side of each board is the scrap side so you don't accidentally cut from the wrong end.

Set your miter saw to 22.5 degrees and leave it there for all your octagon cuts
Photo: Freepik
Step 3: Cut the Frame of the Octagon Table That Holds Everything Together
The center of your table needs a strong frame to hold the octagon shape. You're going to build an X-frame that spreads the weight evenly and gives you a solid base.
What You Need for the Center Frame:
- 2 pieces of 2x4 lumber, each 50 inches long with 45-degree cuts on the ends (these will cross each other)
- 8 support pieces, each 24 inches long with one straight end and one 22.5-degree end
The two long pieces cross in the middle to make an X that holds everything steady. The eight shorter pieces spread out from the center like spokes on a wheel to make your octagon shape. Each spoke has to be in exactly the right spot, or your tabletop boards won't fit.

Cut the x-frame of octagon table picnic
Photo: Freepik
Step 4: Cut the Boards for Your Octagon Picnic Table Top
Your table top is made of four rings of boards, each ring a different length. This is what makes the table look like a smooth circle, even though it's really an octagon.
How long to cut each ring:
- Inside ring: 8 boards at 12 inches each
- Second ring: 8 boards at 18 inches each
- Third ring: 8 boards at 24 inches each
- Outside ring: 8 boards at 30 inches each
Every single board needs a 22.5-degree cut on both ends. The trick on how to build an octagon picnic table in step 4 is keeping the angles the same while changing the lengths. You can set up your stop blocks for each different length and cut all the boards of the same size at once.
Phase 2: Build the Central Framework for Octagon Picnic Table
Step 1: Put Together the Center Frame
Now it's time to build the X-Frame that will be the backbone of your table. You start by crossing your two 50-inch pieces right at their centers. Use both wood glue and pocket screws to make this joint extra strong. This is the spot that will carry the most weight, so don't rush this part or use cheap screws.
Here is how you can put it together:
- Put wood glue on where the pieces will cross
- Clamp them together and make sure they form perfect right angles
- Drill your pocket holes and put in the screws
- Let the glue dry for 30 minutes before you do anything else
Once your X-frame is solid, you can attach the eight spokes that stick out like wheel spokes. Each spoke has to be exactly 22.5 degrees from the ones next to it. Don’t forget to use a protractor to mark where each one goes on the X-frame before you start attaching them.
Step 2: Install Octagon Table Top
Now that your frame is done, we can add the boards that make up the actual table surface. If you cut everything right, the boards should fit together nicely with only small gaps.
How to install the boards: Start with the shortest boards on the inside and work your way out to the longest ones.
- First, you lay out all the boards for the inner ring without screwing them down yet.
- Check how they fit and make sure the spacing looks good.
- Leave about a ¼-inch gap between boards so water can drain and the wood has room to expand.
How to screw them down: You should drill holes first so you don't split the wood, especially near the ends of the boards. Next, you use two screws per board going into each spoke underneath. Then, you put the screws about ¾ inch from the edges and sink them just a little bit below the surface.

Add the boards that make up the actual octagon picnic table surface
Photo: Freepik
Phase 3: Octagon Picnic Table DIY Leg Assembly and Support Structure
Step 1: Cut and Put On the Legs for Octagon Picnic Top
Your table needs strong, steady legs to hold everything up. The eight-sided shape lets you put eight legs around the outside. Yet, standard octagon picnic tables use four legs total — NOT eight. This is because you need open spaces for easy seating access.

Standard octagon picnic tables use four legs total, NOT eight
Photo: Flowyline
- Cut your 4x4 posts to 29 inches long for the table legs. This will give you a 30-inch high table when you add the thickness of the tabletop. But measure your table to be sure because sometimes the lumber is a little thicker or thinner than expected.
- Where to put the legs: Put legs on every other spoke of your frame, which means every other spoke gets a leg (4 legs total for 8 spokes). Then, you mark where each leg of octagon picnic table goes and use a level to make sure each one is straight up and down before you attach it.
- How to attach the legs: We use carriage bolts instead of just screws for the legs. Drill ½-inch holes through both the leg and the frame, then secure with carriage bolts, washers, and nuts. This connection is much stronger than screws, and you can tighten it later if it gets loose.
You might like: Where to Place Table Legs for Stability
Step 2: Build the Frame for the Seats
Building the seat frame is one of the most important steps of how to build an octagon picnic table. The seat frame is like a smaller version of your tabletop frame but lower down. This frame has to be really strong because it holds the weight of everyone sitting on it.
Build this second frame 15 inches off the ground, which will give you a 17-inch high seat. Use the same eight-sided shape as your tabletop but with shorter pieces.
What You Need for the Seat Frame:
- One long beam that goes all the way around the outside
- Eight shorter supports that connect to the legs
- Cross-braces between legs to make everything more solid
The beam that goes around the outside does most of the work holding up the seats. The shorter supports send the weight down to the legs. Put cross-braces between the legs so the whole thing doesn't wobble or twist.
Important connections: Pay extra attention to where the seat supports to connect to the legs. These spots get a lot of stress, so use both glue and strong screws or bolts.

Building the seat frame is one of the most important steps when building octagon table
Photo: Freepik
You might like: How to Level Metal Table Legs
Step 3: Put On the Seat Boards
Installing the seat boards is like installing the tabletop boards, but you need to think about comfort and making sure people can get in and out easily.
Seat Board Sizes:
- 16 boards at 32 inches with 22.5-degree cuts on the ends
- 8 boards at 36 inches with 30-degree cuts on the ends (these go between sections)
You start putting on the seatboards from the outside edge and work your way in. Make sure the seats stick out 12 inches from the table edge.
Make the seats comfortable: In the next note on how to build an octagon picnic table, we use a router to round over the top edges of the seat boards just a little bit. Sharp edges get uncomfortable when people sit for a while. A ¼-inch roundover bit works perfectly for this.
Phase 4: Apply Finish for Octagon Picnic Table to Make it Last
Step 1: Sand the Octagon Table with 120-grit sandpaper
Getting the wood surface smooth and ready is really important. It's what makes the difference between a table that looks homemade and one that looks professional.
You should start with 120-grit sandpaper and sand everything in order. Pay extra attention to the cut ends of boards because they're usually rough and soak up stains unevenly. You want all the surfaces to be smooth so the stain goes on evenly.
How to sand everything on octagon picnic table:
- Sand the flat surfaces first (table top and seats)
- Sand the upright pieces (legs and supports)
- Hand-sand any spots your sander can't reach
- Clean off all the dust with a tack cloth or blow it off with compressed air

Start with 120-grit sandpaper and sand everything in order
Photo: Freepik
Note: Don’t forget to fill any gaps, holes, or rough spots with outdoor wood filler. Let the filler dry completely, then you can sand it smooth with the rest of the wood.
Step 2: Put On Wood Conditioner and Stain
As you might know, pressure-treated lumber can be tricky to stain because some parts are wetter than others, and the chemicals make it absorb stain unevenly. However, wood conditioners can fix this problem easily by making the whole surface absorb stains in the same way.
So, the last step in building an octagon picnic table is to put on the wood conditioner and follow the directions on the can (usually 15 — 30 minutes before you stain).
How to Apply the Stain:
- Pick a good outdoor stain that protects against sun damage
- Put the stain on in thin, even coats with a brush or rag
- Work on small sections so you don't get lap marks
- Always brush or wipe with the grain of the wood
- Let each coat dry completely before adding another
Pro tips: We highly recommend putting on two coats of stain for better protection and richer color. The second coat should be lighter than the first, so you don't put on too much and make it look dark and muddy.
FAQs
1. How to Build an Octagon Picnic Table Step By Step?
Building an octagon picnic table is easier than you think when you break it down into simple steps. Yet, these steps are to name the process. You’ll need to read our full octagon picnic table plans free to get detailed instructions:
- Step 1: Set up your miter saw
- Step 2: Practice 22.5-degree cuts on scrap wood
- Step 3: Build an X-frame with 8 spokes
- Step 4: Cut tabletop boards in 4 rings (12", 18", 24", 30")
-
Step 5: Attach legs to every other spoke
- Step 6: Add the seat frame 15" high
- Step 7: Install seat boards
- Step 8: Sand and stain
2. Is it Cheaper to Build or Buy a Picnic Table?
Building your octagon picnic table is usually much cheaper than buying one, especially a quality one that will last.
- Cost to build octagon picnic table: You can make this table for around $150 — 250 in materials, depending on lumber prices in your area.
- Cost to buy octagon picnic table: A decent quality octagon picnic table from a store typically costs $700 — $1,100 or more. Cheaper ones often use thin wood that won't last, while good-quality ones can cost over $2,000.
3. How Many 2x6 to Build a Octagon Picnic Table?
For a complete octagon picnic table, you'll need about 20 — 25 pieces of 2x6 lumber, and it depends on the exact lengths you can buy.
4. How to Measure an Octagon Table?
The best way to measure an octagon table is to measure straight across the middle from one side to the other side. This method tells you how wide your table is. This octagon table will be about 5 to 6 feet across.
- You can also measure along one of the eight flat sides to see how long each side is. All eight sides should be the same length if you built it right.
- To see how tall your table is, measure from the top of the table down to the floor. A standard table should be about 30 inches high.
- If you want to know if the table will fit in your space, measure the widest part across the middle and then add about 3 feet on each side so people have room to sit and move around comfortably.
Make Your Project Easier with Metal Outdoor Table Legs/Bases from Flowyline. Why Not?
Handmade metal furniture makers highly craft metal outdoor table legs and bases from Flowyline Design. Hence, they are durable, have a unique look and contemporary elegance, are budget-saving, easy, and are easy to care for.
Go especially well with any of your tables or bench tops, be it the live edge, wood, or epoxy, be it your custom table, dining table, console table, or oval butcher block table.
These metal table legs and bases are always packed nicely, ready to be delivered to spruce up your living space and come equipped with adjustable levelers hidden well in the feet. All you need to do is to bolt the base on your table or benchtop and go.
How to Build an Octagon Picnic Table: Guide Ends Here
Building an octagon picnic table is a big accomplishment that you can be proud of. Getting all those angles right takes practice, but the skills you learn will help you with lots of other projects down the road. Best of all, you'll end up with a one-of-a-kind table that becomes the heart of family barbecues and outdoor dinners for years to come.
Don't worry if this is your first big woodworking project. Everyone good at this stuff started somewhere, and they all made mistakes along the way. Just remember the old saying: “Measure twice, cut once.”
If you're looking for more on how to build an octagon picnic table guide, check out other blogs for creating outdoor furniture that will transform your backyard. If you have any questions, don't hesitate to reach out to the Flowyline team. Thank you for reading!
